


Introduction
You probably have heard of Blazor, you may even want to use it. The problem is you still have existing projects. It's hard to justify the time it takes to rewrite your project to Blazor. But you do like to use Blazor to provide a better user experience without touching javascript. Well, lucky for you there is a way to integrate Blazor into your existing MVC project. Giving you the power of Blazor without the time investment.
In this tutorial we take 4 simple steps to integrate a Blazor component into your project.
If you prefer a video tutorial, please check the youtube format:
youtube
Starting requirements
- MVC project with .NET 5 or higher
Step 1 - Adding the Blazor project
In the first step we are creating a Blazor project and adding a referencing it in the MVC project.
1.1 Creating a Blazor project
To make sure that we can create Blazor component we first need a Blazor project.
We can do this with the command: dotnet new blazorwasm or though the Visual studio UI.
During the creating of the project, it is important to use .NET 5 or higher.
1.2 Adding references to MVC
To make sure that we can render the component in our MVC project we want to make sure that we add a reference the Blazor project in our MVC project. You can do this though the Visual studio interface or by editing your .csproj
Step 2 - Preparing the MVC project
In this step we prepare our MVC project to have the required packages and setting up our Startup to handle Blazor.
2.1 Installing packages
We need to install a package to allow our program to handle the Blazor. You can install the package by running the following command or by using the Visual Studio Nuget package manager.Install-Package Microsoft.AspNetCore.Components.WebAssembly.Server -Version 5.0.6
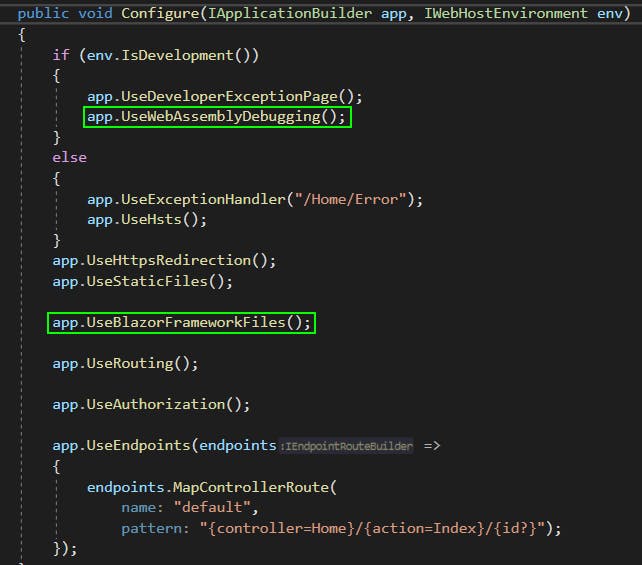
2.2 Updating Startup
Now that we added the package we need to call the library in the startup.
In the Configure method we want to go into the if (env.IsDevelopment()) and add the following line app.UseWebAssemblyDebugging(); and add add app.UseBlazorFrameworkFiles(); outside of the if statement.
Step 3 - Preparing the Blazor project
In this step we are going to prepare the Blazor project by deleting a few files and updating the Program.cs
3.1 Updating the Program.cs
In the Program.cs of the Blazor project we want to remove the following line builder.RootComponents.Add<App>("#app");

3.2 Deleting files
In the wwwroot of the Blazor project we want to delete the index.html and the favicon.ico. This prevents any duplicate errors when building our MVC project.
Step 4 - Rendering the Blazor Component
In the final step of this tutorial we test our progress by rendering a component. We will use the Counter component from a new project. Of course you can render any components that you want.
4.1 Rendering the component.
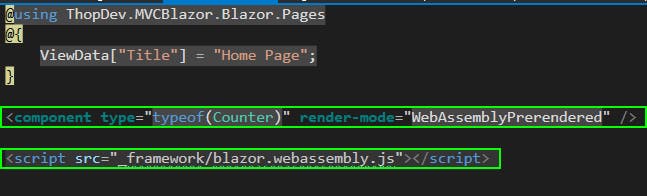
We want to open any page that we have in our MVC project. In our case this is Views/Home/Index.cshtml. After this we want to add a component we can do this by adding a component tag<component type="typeof(**ComponentName**)" render-mode="WebAssemblyPrerendered" /> In this example, you want to replace the ComponentName with your component, in our case this is the Counter component.
4.2 Adding blazor.webassembly.js
The final step is to add the blazor webassembly interpeter. You can do this by adding <script src="_framework/blazor.webassembly.js"></script> to the page.
Checking the result
We just added Blazor to our MVC project, we can now test if it works. We do this by starting our MVC project and navigating to the page that you added the component too. In our case this is the Home with the Counter component. The Counter comonent this is a very good component to verify that it works as you can easly check if the number updates.

Summary
In this tutorial we created and added a Blazor project to an existing MVC project. We made sure that MVC had the correct packages and clean up the Blazor project. We also created an example page to verify that it works.
After Word
Thanks you for reading this post. If you have any problems please contact me though the reactions below or though another platform.
If you enjoyed this content, please share this post as it helps me a lot.
Follow me on Twitter
View me on Youtube
Watch me on Twitch live every monday 19:00
CET